

IMPROVE MANUFACTURING THROUGHPUT WITH PLEXUS ADHESIVES
RIVET REPLACEMENT
Rivets might appear to be quick and easy to use, able to join dissimilar substrates, and be easily repaired. However, they require pre-drilling in the materials to be joined, which can weaken the overall joint integrity, concentrate stress at a single or multiple point locations (rather than an even distribution of stress) and require secondary sealing steps. Manufacturers who have converted from riveted assemblies to structurally bonding with Plexus adhesives have found the following benefits:- Faster manufacturing speed and throughput
- Improved durability
- Lower cost of assembly
- Cleaner aesthetics
- Worker safety and ergonomics
- Fewer warranty issues
SEE HOW EASY IT IS TO APPLY PLEXUS ADHESIVES
Seeing is believing. Watch this short video to see how easy it is to apply Plexus adhesives.
FASTER THROUGHPUT
Riveting adds a cumulative time effect and cost on a process. This means punched or drilled holes must be made ahead or during the assembly process on both substrates, time is taken to manually place the rivets in each hole which is followed by “popping” the rivet and quite often another sealing step. On the other hand, Plexus adhesives often just require dispensing, clamping and unclamping. They also eliminate timely and costly secondary sealing steps. The time comparison below demonstrates the cumulative effect with the use of rivets as well as the much faster adhesive assembly process.

INCREASED DURABILITY
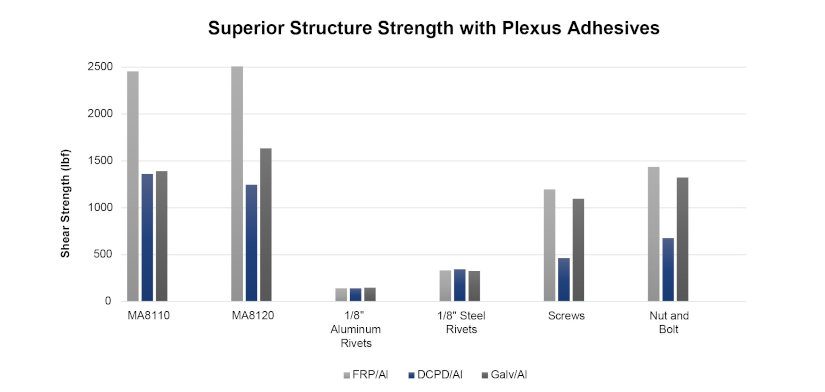
Plexus structural adhesives provide continuous connections, no stress point sources, high strength and extremely high fatigue resistance. This will often lead to a significantly stronger structure, especially when compared to the point stress loads that rivets induce.
LOWER COST OF ASSEMBLY
Individual rivets vary in price from dollars per lb or to a few cents per rivet. When calculating the cost of an assembly consider the following:
- Cost of Materials (rivets or adhesive and other consumables)
- Labor Cost (including drilling and preparation to downstream activities like sealing)
- Equipment Amortization
Plexus structural adhesives tend to be stronger and more cost effective than rivets. The largest savings comes from the improved throughput and reduction in labor costs, especially if the process is using manual drill of rivet holes and/or secondary sealing steps.
Below is a case study for a manufacturer that switched from a riveted roof assembly to a structural adhesive. Not only was the structural adhesive stronger and more durable, but it saved significant manufacturing time and reduced the mass.

CONVERTING FROM RIVETS TO AN ADHESIVE
Below are some key questions to help identify if an application is right for PLEXUS metal bonding adhesives:
- How much strength is required?
- How much time does my current riveting process take including drilling and sealing?
- Are there areas more prone to leaks?
- Am I forced to use more expensive rivets for higher strength requirements?
- How often does misalignment happen with riveting?
- Are there corrosion concerns (especially joining painted steel to aluminum with a rivet)?
Have a project looking to convert from welding to structural adhesives? Contact a Plexus Adhesive Representative to help with the project.
CLAMPING
Plexus adhesives are engineered to be thixotropic (non-sag), but also spread very easily. Best practice is to ensure even clamp pressure across the bondline. Here are some tips for clamping:- Only 0.75PSI – 1.75PSI clamp pressure is needed to spread out most Plexus products
- For flat sections, bar clamps help provide even pressure
- Mechanical fasteners can be used as clamps to help move products down line faster
- Certain plexus products contain glass beads to prevent excess squeeze out
- Engineered standoffs or gaps can help contain the adhesive and guarantee certain bond gaps
SURFACE PREPARATION FOR ADHESIVES
Plexus adhesives are engineered to be very robust with minimal surface preparations.
- Thermoplastics – A simple wipe (to remove any dust) is sufficient in most cases
- Composites – Depends on the chemistry, many RTM composites can be bonded after a dry rag wipe or solvent wipe. Other composites might need light abrading
- Raw Metal – Plexus has a line of primer-less to metal adhesives, which can often bond after a solvent wipe. For heavily oxidized metal, abrasion and solvent wipe is recommended
- Coated Metals – Can often be bonded as is after a wipe to remove any dust
Testing the exact material is important to any successful project. ITW PP can assist to choose the right system to help start your testing process.
Have a question about your material? Please reach out to our Technical Service Department.
REPAIRING A PLEXUS BONDED JOINT
Plexus structural adhesives can be very easily repaired with some practice and a good procedural document. Plexus adhesives tend to soften with heat (especially about 250°F) and are weakest in peel. With that in mind, a sample workflow would be:
- Start at one end of bondline (usually the top)
- Optional: Use a heat gun to warm the adhesive between 250°F to 350°F
- Use a pneumatic air chisel (windshield remover) to cut into the adhesive at one end
- Use a prybar to apply light pressure and place the adhesive in peel mode
- Continue down bondline with air chisel while maintaining peel pressure
- Scrape excess adhesive with a scraper
To learn more about Plexus products, contact our Technical Service Department today!