

Use this Quick Reference Product Sheet or Technical Bulletin as a handy epoxy grout process reference and to familiarize yourself with newly added product packaging information. Salespeople, estimators, and warehouse personnel at ITW, distributors, contractors and engineering firms have all found this Chockfast installation helpful in aiding them in their business needs.
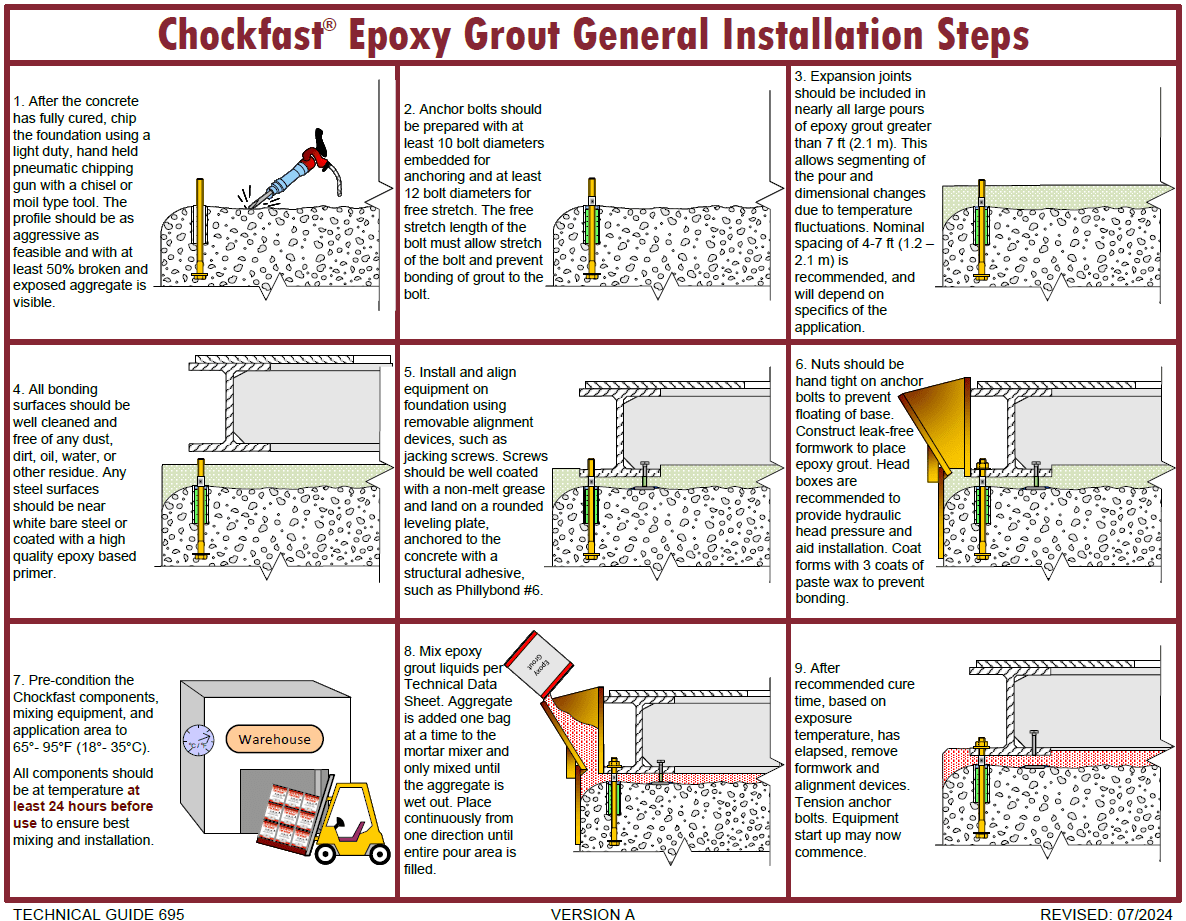
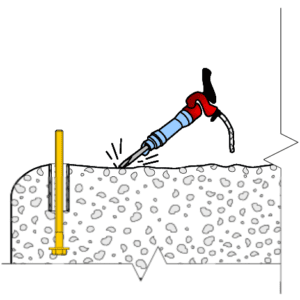
Step 1. After the concrete is fully cured, chip the foundation using a light duty, handheld pneumatic chipping gun with a chisel or moil type tool. The profile should be as aggressive as feasible and with at least 50% broken and exposed aggregate is visible.
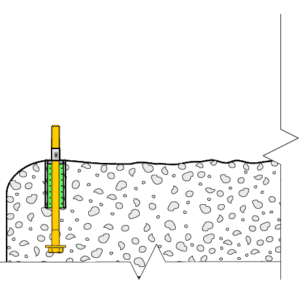
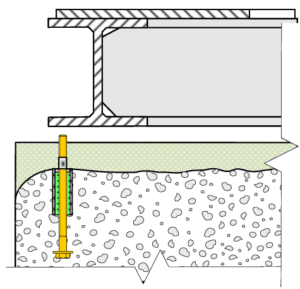
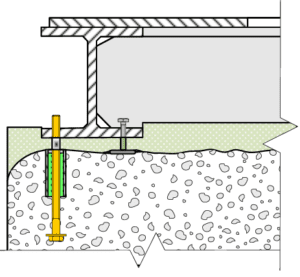
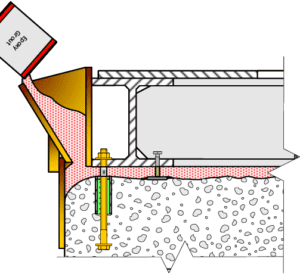
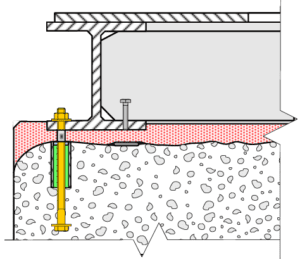
Step 2. Anchor bolts should be prepared with at least 10 bolt diameters embedded for anchoring and at least 12 bolt diameters for free stretch. The free stretch length of the bolt must allow stretch of the bolt and prevent bonding of grout to the bolt.
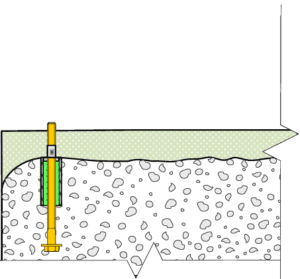
Step 3. Expansion joints should be included in nearly all large pours of epoxy grout greater than 7 ft (2.1 m). This allows segmenting of the pour and dimensional changes due to temperature fluctuations. Nominal spacing of 4-7 ft (1.2 – 2.1 m) is recommended and will depend on specifics of the application.
Step 4. All bonding surfaces should be well cleaned and free of any dust, dirt, oil, water, or other residue. Any steel surfaces should be near white, bare steel or coated with a high quality epoxy based primer.
Step 5. Install and align equipment on foundation using removable alignment devices, such as jacking screws. Screws should be well coated with a non-melt grease and land on a rounded leveling plate, anchored to the concrete with a structural adhesive, such as Phillybond #6.
Step 6. Nuts should be hand tight on anchor bolts to prevent floating of base. Construct leak-free formwork to place Chockfast epoxy grout. Head boxes are recommended to provide hydraulic head pressure and aid installation. Coat forms with three coats of paste wax to prevent bonding.
Step 7. Pre-condition the Chockfast components, mixing equipment, and application area to 65°- 95°F (18°- 35°C). All components should be at temperature at least 24 hours before use to ensure best mixing and installation.
Step 8. Mix Chockfast epoxy grout liquids per Technical Data Sheet. Aggregate is added one bag at a time to the mortar mixer and only mixed until the aggregate is wet out. Place continuously from one direction until entire pour area is filled.
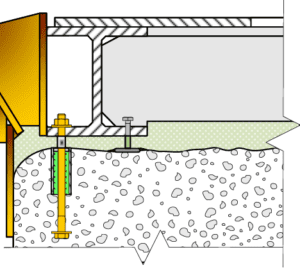
Step 9. After recommended cure time (based on exposure temperature) has elapsed, remove formwork and alignment devices. Tension anchor bolts. Equipment start up may now commence.
PRC 100 Non-Shrink Cement Grout: ITW PRC 100 Non-Shrink Cement Grout is a high performance, non-shrink, precision grout that meets or exceeds all requirements of ASTM C1107. It is designed for a wide range of consistencies from damp pack to high fluidity, meeting the most demanding job conditions.
Devcon Ceramic Repair Putty or Devcon Brushable Ceramic: Repair Liquid or Putty Ceramic filled, high build, brushable or trowelable epoxy coating. Formulated for unequaled chemical and corrosion resistance with outstanding wear properties under adverse environments. Brushable version available in Red, White, or Blue.
Devcon Titanium Repair Compound: Titanum Repair Compound for high bond strength repair systems. Specific formulation providing industry with a fast, permanent repair to equipment even with joining dissimilar metals.
PhillyBond #6: Two-component, high strength epoxy paste for the repair of punctures, cracks, holes, voids, & to provide a smooth surface for repairs [temperatures up to 428°F]. Resistant to most acids, alkali & hydrocarbons and will adhere to metals, wood, & plastics.
ITW Release Agent: Prevents adhesion between most ITW products and surfaces of metal, glass, rubber and many plastics. It is used where the minimum possible clearance between resin and mating surface is required.
Chockfast PG-2089: Two-component, non-sagging epoxy mortar designed for general repair and maintenance. It is an effective adhesive to join concrete to concrete, masonry or dissimilar materials. It is useful as an adhesive to attach items to surfaces in areas where strength, waterproofing and durability are desired.
PhillyClad 1775/620TS: A specially formulated, low-viscosity, epoxy adhesive system designed for pressure injection repairs to concrete and adhesion of new concrete to old concrete.
MS-7CZ Metal Primer: HAPS free primer with specially formulated zinc complexes providing cathodic protection against corrosion. 71% solids heavy duty, anti-corrosive epoxy-polyamide primer which forms a tough abrasion resistant film that protects the substrate.
ITW Repair Compound: Two component epoxy paste for filling, smoothing, and fairing applications on metals, plastics (FRP), wood, or masonry. Non-sagging properties of compound make it easier for leveling rough or pitted plating, forming fillets, smoothing weld seams, etc.
Have questions on general installation steps or more specific applications? Reach out to our epoxy grout experts. We’re here to help!
View all our Technical Data Sheets and Safety Data Sheets. Need some help? Ask a technical question and find a solution!
Further reading: Laying The Foundation For Success With Chockfast® Epoxy Grouting and Critical Machinery Installation In Cold Weather? Find Out How To Plan For Success.
For more stories like this, follow ITW Performance Polymers on LinkedIn and sign up for enewsletter in our website footer.
| Cookie | Duration | Description |
|---|---|---|
| cookielawinfo-checkbox-advertisement | 1 year | Set by the GDPR Cookie Consent plugin, this cookie records the user consent for the cookies in the "Advertisement" category. |
| cookielawinfo-checkbox-analytics | 11 months | This cookie is set by GDPR Cookie Consent plugin. The cookie is used to store the user consent for the cookies in the category "Analytics". |
| cookielawinfo-checkbox-functional | 11 months | The cookie is set by GDPR cookie consent to record the user consent for the cookies in the category "Functional". |
| cookielawinfo-checkbox-necessary | 11 months | This cookie is set by GDPR Cookie Consent plugin. The cookies is used to store the user consent for the cookies in the category "Necessary". |
| cookielawinfo-checkbox-others | 11 months | This cookie is set by GDPR Cookie Consent plugin. The cookie is used to store the user consent for the cookies in the category "Other. |
| cookielawinfo-checkbox-performance | 11 months | This cookie is set by GDPR Cookie Consent plugin. The cookie is used to store the user consent for the cookies in the category "Performance". |
| CookieLawInfoConsent | 1 year | CookieYes sets this cookie to record the default button state of the corresponding category and the status of CCPA. It works only in coordination with the primary cookie. |
| elementor | never | The website's WordPress theme uses this cookie. It allows the website owner to implement or change the website's content in real-time. |
| PHPSESSID | session | This cookie is native to PHP applications. The cookie stores and identifies a user's unique session ID to manage user sessions on the website. The cookie is a session cookie and will be deleted when all the browser windows are closed. |
| viewed_cookie_policy | 11 months | The cookie is set by the GDPR Cookie Consent plugin and is used to store whether or not user has consented to the use of cookies. It does not store any personal data. |
| Cookie | Duration | Description |
|---|---|---|
| li_gc | 6 months | Linkedin set this cookie for storing visitor's consent regarding using cookies for non-essential purposes. |
| lidc | 1 day | LinkedIn sets the lidc cookie to facilitate data center selection. |
| UserMatchHistory | 1 month | LinkedIn sets this cookie for LinkedIn Ads ID syncing. |
| Cookie | Duration | Description |
|---|---|---|
| _ga | 1 year 1 month 4 days | Google Analytics sets this cookie to calculate visitor, session and campaign data and track site usage for the site's analytics report. The cookie stores information anonymously and assigns a randomly generated number to recognise unique visitors. |
| _ga_* | 1 year 1 month 4 days | Google Analytics sets this cookie to store and count page views. |
| _gcl_au | 3 months | Google Tag Manager sets the cookie to experiment advertisement efficiency of websites using their services. |
| _hjSession_* | 1 hour | Hotjar sets this cookie to ensure data from subsequent visits to the same site is attributed to the same user ID, which persists in the Hotjar User ID, which is unique to that site. |
| _hjSessionUser_* | 1 year | Hotjar sets this cookie to ensure data from subsequent visits to the same site is attributed to the same user ID, which persists in the Hotjar User ID, which is unique to that site. |
| AnalyticsSyncHistory | 1 month | Linkedin set this cookie to store information about the time a sync took place with the lms_analytics cookie. |
| CONSENT | 2 years | YouTube sets this cookie via embedded YouTube videos and registers anonymous statistical data. |
| utm_campaign | past | Google Ad Services sets this cookie to store session campaign value if present. |
| utm_content | past | This cookie is used for storing the session content value if present. |
| utm_source | past | This cookie is used to record from where the visitor came to the website orginally. This information is used by the website operator to know the efficiency of their marketing. |
| utm_term | past | This cookie is used to record from where the visitor came to the website orginally. This information is used by the website operator to know the efficiency of their marketing. |
| Cookie | Duration | Description |
|---|---|---|
| bcookie | 1 year | LinkedIn sets this cookie from LinkedIn share buttons and ad tags to recognize browser IDs. |
| bscookie | 1 year | LinkedIn sets this cookie to store performed actions on the website. |
| handl_ip | 1 month | HandL UTM Grabber plugin sets this cookie to record the web browser's IP address. |
| handl_landing_page | 1 month | HandL UTM Grabber plugin sets this cookie is used to record the very first page you visited on our site in your browser. |
| handl_original_ref | 1 month | HandL UTM Grabber plugin sets this cookie to record the URL from which you came to our site. |
| handl_ref | 1 month | HandL UTM Grabber plugin sets this cookie to record the URL from which you came to our site. |
| handl_url | 1 month | HandL UTM Grabber plugin sets this cookie to form the URL on which we placed the code that generates. |
| IDE | 1 year 24 days | Google DoubleClick IDE cookies store information about how the user uses the website to present them with relevant ads according to the user profile. |
| li_sugr | 3 months | LinkedIn sets this cookie to collect user behaviour data to optimise the website and make advertisements on the website more relevant. |
| test_cookie | 15 minutes | doubleclick.net sets this cookie to determine if the user's browser supports cookies. |
| utm_medium | past | This cookie is used to record from where the visitor came to the website orginally. This information is used by the website operator to know the efficiency of their marketing. |
| VISITOR_INFO1_LIVE | 6 months | YouTube sets this cookie to measure bandwidth, determining whether the user gets the new or old player interface. |
| YSC | session | Youtube sets this cookie to track the views of embedded videos on Youtube pages. |
| yt-remote-connected-devices | never | YouTube sets this cookie to store the user's video preferences using embedded YouTube videos. |
| yt-remote-device-id | never | YouTube sets this cookie to store the user's video preferences using embedded YouTube videos. |
| yt.innertube::nextId | never | YouTube sets this cookie to register a unique ID to store data on what videos from YouTube the user has seen. |
| yt.innertube::requests | never | YouTube sets this cookie to register a unique ID to store data on what videos from YouTube the user has seen. |
| Cookie | Duration | Description |
|---|---|---|
| past | No description available. | |
| gclid | past | Description is currently not available. |
| username | past | No description available. |
| VISITOR_PRIVACY_METADATA | 6 months | Description is currently not available. |