

When you need best practices for epoxy grout pour design, control joint spacings, and preventing edge lifting, the Chockfast® technical team is available and works to go above and beyond. Whether it’s specific recommendations on product selection, or general suggestions like controlling temperatures and conditions during installation, our epoxy grout experts work to provide strong solutions including connecting your team with a local distributor.
We can work with you to become familiar with your application and project plans, to offer best practice recommendations. See our step-by-step references of Typical Installation Procedure for Epoxy Grouts, as an example. Although not all applications are identical, there is common guidelines for epoxy grouts found. Below are the most common general guidance on the recommended spacing for expansion/control joints.
Control Joints
Control joints are recommended for nearly all installations of epoxy grout, as they serve the following purposes. Considerations should be made for foundations exposed to the environmental conditions:
- Break the pour into smaller and more manageable sections.
- Direct the flow of epoxy grout, which is especially beneficial when material needs to flow more than 6 ft (2 m).
- Plan for the potential creation of natural breaks in the pours due to thermal changes, which typically present as vertical cracks.
- Create a stopping point, if necessary, during an installation due to emergency shut down or on-site conditions.
- Reduce the amount of lost material in the event of a formwork failure.
Prediction of location and spacing on control joints or segmentation of a pour of expansion joints are inexact sciences. This is because there are a multitude of factors that contribute to spacing, including:
- Peak exothermic temperature of the epoxy grout.
- Tensile strength of the epoxy grout.
- Thickness and pour dimension of the epoxy grout.
- Heat sink available from surrounding steel and concrete structures.
- Operating temperature of the equipment.
- Worst case temperature range experienced by the epoxy grout.
- Rapidity of the temperature changes experienced by the epoxy grout.
Because of this complexity, we can only offer general recommendations. For control joints, we offer the following general recommendations on spacing.
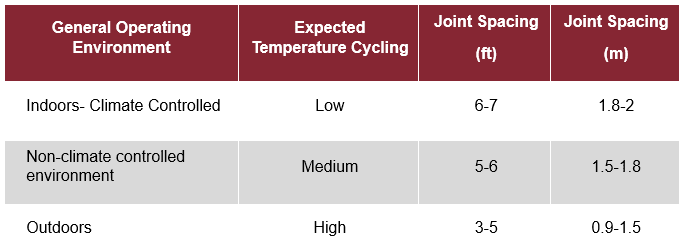
These spacing recommendations are considered to be general and will not guarantee that there will not be additional, natural creation of control joints, otherwise referred to as vertical cracks. We can offer advice based on our experience on placement, but as mentioned, it is not certain that additional joints will be needed based on actual conditions. Control joints are also greatly beneficial in directing the flow of epoxy grout under compressors and segmenting large pours into smaller sections. In the event of a shut down or a blow out of form work, this has proven to be an extremely valuable technique.
If the joint spacing is too large, one will find out due to the natural creation of expansion joints, otherwise referred to as vertical cracks. Our Technical Bulletin 662: “Installing Expansion Joints” goes into more details on recommendations for construction of control joints. Please refer to our library of technical bulletins, including 662, for further resources.
Edge Lifting
For information on Edge Lifting, here are our general recommendations:
Chockfast epoxy grouts, as well as all epoxy grouts, are intended to be maintained in compression. When the material is not in compression, issues such as curling and edge lifting are normal and to be expected. For specific details on Edge Lifting like more information on the phenomenon of Edge Lifting, including causes, how it presents, ways to avoid, and ways to fix if it has occurred, reach out to out Chockfast technical services team. We can provide details on the recommendation for inserting and locating rebar pins to help minimize the likelihood of edge lifting and recommendations to chamfer the edges of the foundation and more.
The need for pinning or chamfering is as much about thermal volatility of the operating environment as it is with width of open shoulder distance, but both are part of the equation in deciding to address potential edge-lifting. It is never detrimental to include edge pins, though most do not wish to spend the extra time and effort.
Other Frequently Asked Questions
Primers for steel baseplates. What is the recommended preparation and primers for steel baseplates? ITW Performance Polymers Recommendations:
- Although the best recommendation is to apply epoxy grout to white bare steel, it is understood this is not always possible.
- If a steel plate or structure is not to be installed for a period of time, ITW Performance Polymers recommends that a high quality, straight epoxy or epoxy-based primer be applied at three mills or less to the sandblasted and cleaned steel.
- Just prior to installing equipment using our epoxy grouting products, the bottom or mounting surfaces should be cleaned and degreased with either a solvent wash or a cleaning product that does not leave a residue.
- It is our recommendation that at no time should any primer containing inorganic zinc be used with epoxy grouts.
While these types of primers adhere well to steel and to epoxy, they tend to have incredibly low internal tensile strength and often allow the bond between the epoxy and the steel to easily break.
Edge (hair) Pins for unrestrained Shoulders of less than 6 inches: Are hairpins required for any unrestrained shoulders of less than 6” (300-mm)?
- Our epoxy grout engineers can provide specific recommendations.
- Historical and standard industry recommendations have been to include edge pins, including hair pins or wickets, for any installation with a shoulder width in excess of 6” or whenever the width of the shoulder exceeds the depth of pour. This corresponds with best practice in the industry.
- Example of wording from API 686:
When specified, grouting pins of #6 reinforcing bar should be provided around the perimeter of the baseplate or soleplate on 150 mm (6 in.) centers to prevent delamination between the concrete foundation and the epoxy grout.
Grouting pins should be set in epoxy with a 100 mm (4 in.) minimum embedment depth before installation of grout on foundation and should not project above concrete higher than ⅔ of grout pour depth.
Grouting pins are typically only required where the grout extends beyond the perimeter-edge of the baseplate 152mm (6 in.) or more.
While this guidance has worked in most situations, there are instances where edge lifting has occurred with as little as a 2” shoulder. Our guidance is that it is never detrimental to include edge pins, even if a shoulder width if less than 6”, though it may not make economic sense to spend the extra time and effort. In many environments that do not experience rapid temperature fluctuations, it isn’t a major concern. Note: There will likely not be a significant difference in the reduction in potential edge lifting gained by a #6 rebar over a #3 or a #4. A #3 or #4 will be much easier to work with on-site.
Therefore, from the perspective of edge lifting, we are discussing differences between good, better, and best practices. It is good to include pins if there is a shoulder 6” or more beyond the footprint, as this eliminates probably 90% of the potential occurrences of edge lifting. It is better to include pins if there is a shoulder 4” or more beyond the footprint and to chamfer the edge of the foundation, as this eliminates probably 99% of the of the potential occurrences of edge lifting. It is best to limit shoulder widths to no more than 2 to 3”, as this eliminates probably 99.999% of the potential occurrences of edge lifting. Note: this only looks to edge lifting and not other aspects, including total cost or difficulty of installation.
Reach out to the Chockfast technical team for your project needs and time-tested advice on how to have successful epoxy grout foundations. Whatever the application and whatever the questions are, our team is happy to provide solid direction that empowers your team to finish your project with reliable results.
By: Christopher Matthews-Ewald, Senior Applications Engineer
View all our Technical Data Sheets and Safety Data Sheets. Need some help? Ask a technical question and find a solution!
Further reading: Cheat Sheet: Chockfast® Epoxy Grout Typical Installation Steps and Critical Machinery Installation In Cold Weather? Find Out How To Plan For Success.
For more stories like this, follow ITW Performance Polymers on LinkedIn and sign up for enewsletter in our website footer.